

BRAKING POINTS | PART FOUR
CLEANING AND REPLACING PARTS ON YOUR BRAKES
FOR THE BEST PERFORMANCE
PRESENTED BY TRP
Picture you and your four best friends driving down the highway in a full blizzard with bikes on the back as you try to escape the sour weather in the mountains for some all-time desert riding. If you find yourself local to Ogden, Utah like we are, then dragging your bike through the snow or rain to find blue skies and dry dirt is a common occurrence. But have you ever stopped to think about the effect road grime, tire spray, mud, and dust can have on your brakes? Well, hopefully after reading this article you’ll start too and even pick up a tip or two of how to best take care of your brakes because in this TRP Technical Column, we are going to share some of our braking expertise from years of research and development with our professional athletes on World Cup tracks around the world by covering everything you need to know about cleaning and replacing wear parts on your hydraulic disc brakes.
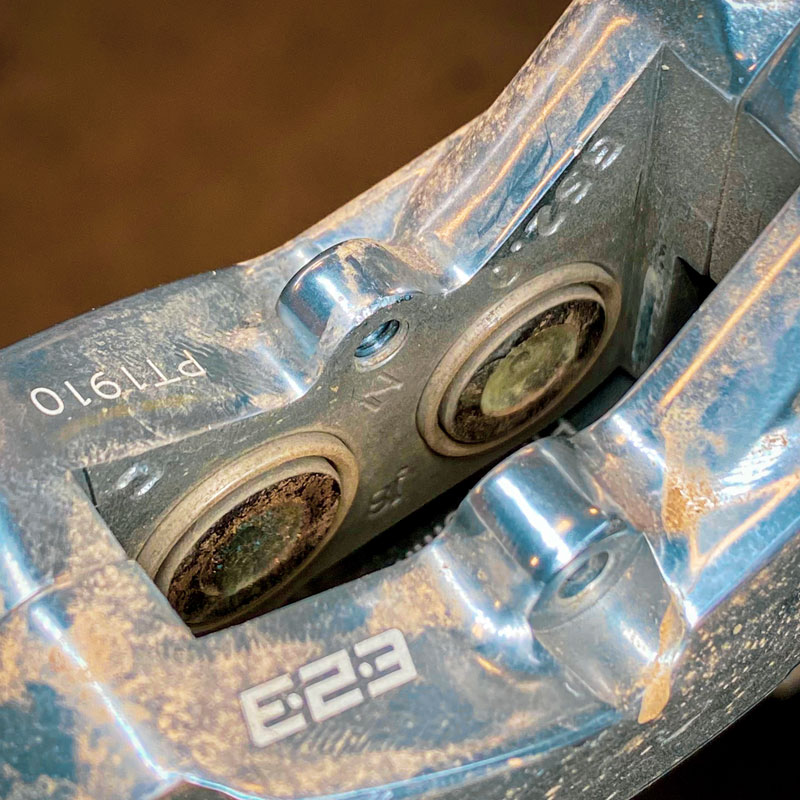 When a disc brake is used regularly and exposed to mud, dust, or roadway grit, micro particles will naturally collect around the exposed parts of the pistons. If not properly cleaned, an excess of these particles will etch the outside of the pistons, degrade the delicate seals, and allow fluid to leak through thus compromising the hydraulic pressure of the system and giving you a one-way ticket to replacing the entire caliper. Along with this, these particles can congregate within the striations of the rotor and even embed themselves in the pores of the pads which can change the surface friction coefficient and heat characteristics of the system. This can lead to permanent glazing on the rotors as the system fights to burn through the contaminants which results in a decrease in stopping power and an increase in vibrations and noise. Either way, leave your brakes dirty and you will only encounter problems down the trail. Clean your brakes regularly though, and you will see a decrease in these issues along with an increase in the performance of the braking system by creating more pad surface friction and decreasing piston drag which allows for a lighter feel at the lever for more finite modulation and uninterrupted power. The choice between cleaning and not cleaning seems clear then, but how should you go about it?
There are two methods we like to promote: basic cleaning and advanced cleaning. Basic cleaning will simply consist of wiping the rotors down with a clean microfiber rag or paper towel and Isopropyl alcohol to remove any dirt, dust, road grime, or contamination from the surface of the rotors. At the very least, this should be done every time you wash your bike, lube your chain, drive through rain/snowy conditions, disassemble/reassemble your bike after travel, or replace the pads and rotors with new ones. If you consider yourself a go-getter and are not interested in doing “the very least” when it comes to bike maintenance, then you can actually do this after every ride to ensure your rotors are completely clear from debris. This will only increase the surface friction between the pads and rotor so make sure you always have a clean rag and some isopropyl in your toolbox and do not be afraid to wipe those rotors off once in a while, you might be surprised in how much gunk you find.


If you are interested in finding and removing more gunk, then try out the advanced method which consists of a full piston clean with isopropyl alcohol, and lubrication with mineral oil followed up by another clean of the calipers and rotors with isopropyl. As a rule of thumb, this should be done every time you change your pads since you will likely need to push the pistons back into the housing of the caliper which can damage those precious seals if not cleaned properly. This can also be done after severely muddy or dusty rides, after a bike wash, or during a bleed. In fact, on the UCI World Cup Circuit, a piston clean and lubrication is done every day for TRP Sponsored teams to ensure each system is operating smoothly and there is no alteration in the performance. By removing grime and lubricating the pistons, it ensures that all are actuating with equal pressure. With hydraulic brakes, fluid will follow the path of least resistance so if one of your pistons is moving more easily than the others, you will begin to feel a slight unresponsiveness when pulling the lever as that freely moving piston will push the pad to contact with the rotor before the slower moving ones catch up. And on the flip side of things, those freely moving pistons will retract quicker than the slower moving ones leaving the pads to contact the rotor for longer. This is what we refer to as piston drag and it can be quite a pesky problem as it allows more heat to build in that dragging quadrant which not only leads to pads being glazed, but it also a loss in rotational momentum as the system is creating friction to slow the wheel. Therefore, by lubricating the pistons with the same mineral oil that is found inside the brake, you are ensuring that all are able to actuate equally and accurately leaving you with a responsively light feel and no drag. Check out this TRP Tech Talk, which will walk you through how we recommend cleaning and lubricating your pistons.

Now that your rotors are clean and your pistons are properly lubricated, let us get into what parts you should be replacing on your hydraulic disc brakes, when you should be replacing them, and why they need to be replaced.
If the hydraulic system is not showing any signs of leaking or improper actuation, then the only parts that need to be routinely checked and replaced will be the pads and the rotors. These are commonly referred to as “wear items” because the more you use the brakes, the more they will wear out. But at what point should you replace these parts to keep the performance of the system at a maximum? For pads, they are best replaced when the whole pad (material and backing plate combined) falls below 2.5 mm in thickness. At this thickness, the pistons will be extending farther out of their housing to contact the rotor which pulls more fluid away from the reservoir and decreases the hydraulic leverage of the system resulting in a slight loss of power and a spongier feel. It is important to note that the brakes will still be safe for usage all the way down to the backing plate of the pads, but they likely will not retain that snappy and responsive feel. Another time the pads should be replaced is if any oils or other contaminants find their way onto the surface of the pad. Oils from chain lube, all-purpose lube, or even fingerprints can embed deep into the pores of the pad and change the coefficient of friction resulting in very little stopping power and some pretty intense pterodactyl noises. While there are many tips and tricks to get rid of contamination on an affected set of pads, the only way to ensure proper performance is to throw them away and pick up a new set so you aren’t compromising the surface of the rotor. Speaking of which, when is a good time to replace the rotors?

Contaminated pad vs. non-contaminated pad – as you can see, the contaminated pad near the back of the photo is discolored with black streaking and has a smooth surface compared to the non-contaminated pad which is still colored normally with a more porous surface.
In short, you should be replacing your rotors when they get worn too thin or if you are planning on changing pad compounds. While rotors have a much harder surface compared to brake pads, a rotor will also slowly decrease in its thickness as the hardened steel wears off due to the friction with the pads. For the best performance of the system, we recommend replacing rotors after 0.3 mm of wear and for the safety of the system, anything below 0.4 mm of wear. Once the minimum allowed thickness of 1.5 mm is reached, you will start to lose the integrity of the rotor which can decrease your braking power, increase the amount of heat fade, and in some cases, the rotor will actually buckle under load and cause damage to you or the system. To avoid these issues and make it easy for our customers to know when to replace their rotors, TRP places specific wear markers along our rotors to indicate when the rotor should be replaced. For our 2.3 mm thick and 1.8 mm thick rotors, these wear markers will be visable down to 0.4 mm of material loss on each side so once the wear marker is completely worn off the surface of the rotor, it is time to replace it with a fresh one.

Another reason to change rotors is anytime you are planning on changing your pad compound from say an organic-resin compound to a sintered metallic compound. The reason being, when the resin compound is bedded into the rotor, it will create a specific footprint of striations along the track of the rotor reflecting the pores of the resin compound. This allows the pad to fit perfectly within these striations and have full surface area contact offering the most stopping power and the least vibration. When you take that same rotor and pair it with a sintered metallic pad, you will not have a perfectly matched surface between the two because of their differences on the surface pores and the rotor will take much longer to form new striations matching the metallic compound even after thoroughly bedding it in. Think of this like petting a cat backwards. Mixing the two will result in poor stopping power, heavy vibrations, and likely some horrendous noises. To avoid this, the best option is to have a separate set of rotors on hand to swap alongside pad compounds. If money is an object, you can also lightly sand the surface of the rotor using a fine grip paper to reset those striations and better allow a new compound to be bedded in.
Whether you are a seasoned professional or a first timer, implementing some of these practices into your bike maintenance routine can make all the difference when it comes to trailside performance and longevity of the products you are using. Bottom line, make sure you are keeping your system clean and free of contaminants and replace parts when they are worn through and you’ll spend less time in the bike shop and more time on the trails. In the next TRP Technical Article, we will be discussing more maintenance tips dealing specifically with bleed techniques and quick hacks for gaining the best “feel”. Until then, don’t hesitate to reach out with any questions. Drop us a line at info@trpcycling.com or send us a DM through our Instagram page @trpcycling.

